
If you regularly run Trim Ends and Batch Assemble Sanger Sequences before running Antibody Annotator, the Sanger Antibody Analysis workflow lets you configure and run all three steps as a single operation. Rather than waiting for each step to complete before setting up the next, you configure all your options upfront and receive annotated and clustered result files when the entire analysis is finished.
You can also use the workflow to batch-analyze multiple datasets in a single run, producing separate Annotation Results for each dataset.
Jump to:
- What is Sanger Antibody Analysis?
- How do I run Sanger Antibody Analysis?
- Settings
- Single result vs. separate results (batching)
- Applying saved settings as Profiles
-
Viewing your results
What is Sanger Antibody Analysis?
Sanger Antibody Analysis is a workflow pipeline that enables the Trim Ends, Batch Assemble Sanger Sequences and Antibody Annotator pipelines to be run as a single operation. You can configure options for each step in the wizard, click Run, and receive a Biologics Annotation Result document without needing to monitor and trigger each step manually.
This is useful when your input data consists of raw Sanger chromatograms that need to be trimmed and assembled into full-length sequences before annotation. The workflow handles the intermediary steps automatically - trimmed reads are batch assembled, and the resulting Assembly Consensus Sequences are passed directly to the Antibody Annotator.
The workflow also supports batching: if you have multiple datasets (e.g. one sequence list per plate or per donor), you can choose to produce either a single combined result or separate Annotation Results.
The workflow produces the same Biologics Annotation Result(s) as running the Antibody Annotator standalone. All the same analysis capabilities are available, including germline matching, liability detection, clonotypes, clustering, and the full visualization suite. For details on what the annotator does, see Antibody Annotator.
Note: Sanger Antibody Analysis is intended for Sanger-type reads. If your input consists of R1/R2 NGS read pairs, use Workflow: NGS Antibody Analysis instead, which runs Set & Merge Paired Reads ahead of the NGS Antibody Annotator.
How do I run Sanger Antibody Analysis?
Note: the workflow only accepts sequence lists as input. You can group sequences into a list by selecting Pre-processing > Group Sequences.
Select your input file(s) within a folder and go to Workflows > Sanger Antibody Analysis...:
This opens a step-through wizard where you configure options for each step in the workflow. The wizard has four steps: Trim Ends, Batch Assemble, Annotation and Output. Navigate between steps using the Next and Previous buttons.
When you are satisfied with your settings, click Run on the final step to start the workflow.
Settings
The wizard presents each step of the workflow with its own set of options. These are the same options available in the corresponding standalone pipelines, so if you are already familiar with those, the settings will be the same here.
Each step allows you to select a previously saved Profile for that pipeline. See Applying saved settings as Profiles below.
Step 1: Trim Ends
This step trims the lower-quality stretches of bases from the ends of your reads, which helps to prevent incorrect assemblies.
Trimming is optional. Select Skip this Step and the workflow will pass your input files straight to Batch Assembly. However, performance may be worse if sequence quality is particularly poor.
Main Options:
-
Apply trimming to:
- Determines which end(s) of each read are trimmed - for example Both ends, or a single end only.
-
Trim by error probability:
- Trims bases up until the point where trimming further bases will only improve the error rate by less than the limit. Lower the value to trim more aggressively. At the default of 0.05, regions with more than a 5% chance of error per base are trimmed.
-
Maximum low-quality bases:
- Trims until no more than the specified number of low-quality bases remain in the read.
-
Maximum ambiguities:
- Trims until no more than the specified number of ambiguous base calls remain in the read.
-
Discard reads shorter than:
- Removes reads that fall below the specified length once trimming is complete. Use this to drop reads that were trimmed back too far to be useful downstream.
- Removes reads that fall below the specified length once trimming is complete. Use this to drop reads that were trimmed back too far to be useful downstream.
Step 2: Batch Assemble
This step assembles your trimmed reads into full-length consensus sequences - typically joining the forward and reverse reads for each sample and optionally associating heavy chains with their partner light chains.
Batch by:
Determines how the workflow decides which reads belong together.
- Name Scheme (default) - able to both assemble fwd and rev reads, as well as associate chains together. To do this, a Name Scheme must first be created. Please see How to Create a Name Scheme.
- Sequence Name - assembles sequences by matching one part of the sequence name. Enter a name separator and choose the part that corresponds to a unique identifier.
- List - assembles each consecutive pair of sequences within a list: sequences 1 and 2 together, 3 and 4 together, and so on. Useful for interlaced reads that have been grouped into a list.
Assembly Options
When Batch Assembling, you can also choose to:
- Consensus: call Sanger heterozygotes
- This can also be done under a separate Pre-processing option, see more here: Finding and Calling Heterozygotes
For full details, see Batch Assemble Sanger Sequences.
Step 3: Annotation
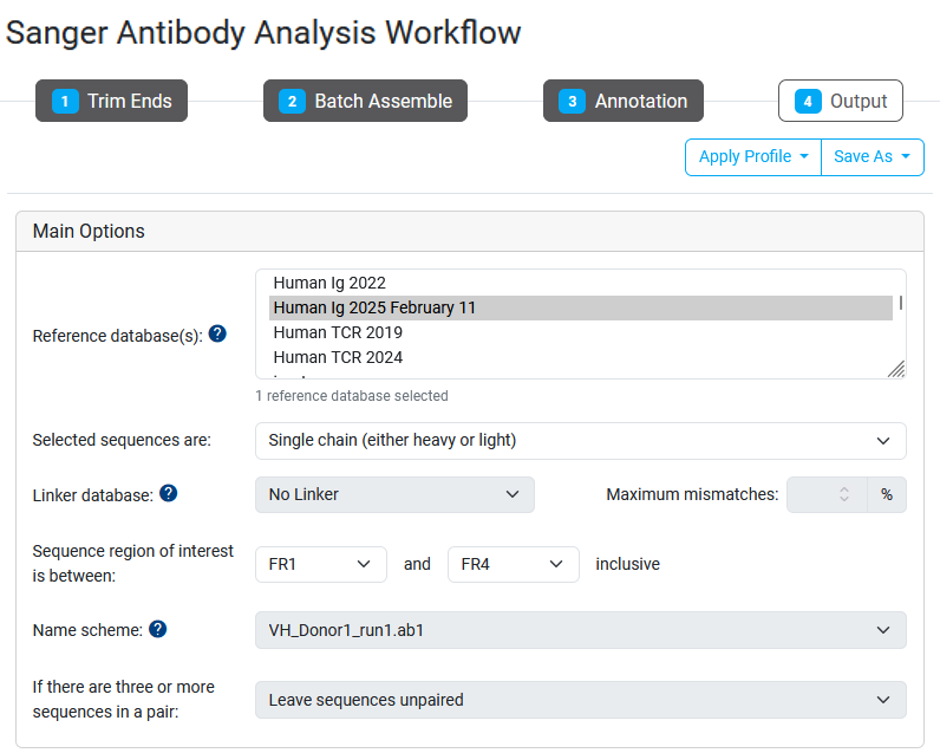
This step configures the Antibody Annotator. The options are identical to those available in the standalone Antibody Annotator pipeline.
As with the previous steps, you can select a saved Profile for the annotator.
For full details on all Antibody Annotator options, see Antibody Annotator.
Step 4: Output
Output folder name:
Optionally specify a name for the output folder where results will be saved. If left blank, results are saved in the same folder as your input files.
Analyze As:
This option determines whether your input datasets are combined or analyzed independently.
- Single Annotation Result - all selected input datasets are combined and analyzed together, producing one Biologics Annotation Result. This is the default option.
- Separate Annotation Results (batching) - each dataset is analyzed independently, producing a separate Biologics Annotation Result per dataset. See Single result vs. separate results (batching) below for details on how datasets are defined.
Overview of Analysis:
A summary of the jobs the workflow will start and the documents each will produce, including how many Annotation Results will be created. Review this to verify that the workflow is configured as expected before running it.
Click Run to start the workflow.
Single result vs. separate results (batching)
When you select Single Annotation Result, all input files are trimmed, assembled and annotated together into one Biologics Annotation Result, regardless of how many sequence lists you selected. The same settings are applied to everything.
When you select Separate Annotation Results, the workflow treats each sequence list independently. Each dataset is trimmed and batch assembled on its own, then passed independently to the Antibody Annotator, which is initialized once per dataset.
All datasets in a batched run use the same settings for every step in the workflow.
The Overview of Analysis in the Output step will show the expected number of Annotation Results, so you can confirm the workflow has correctly identified your datasets before clicking Run.
Applying saved settings as Profiles
Each step in the wizard supports Geneious Biologics Profiles. If you have previously saved profiles for Trim Ends, Batch Assemble Sanger Sequences or Antibody Annotator, you can select them at the top of the relevant step using Apply Profile. You can also save the settings you have configured for a step as a new profile using Save As.
This is useful for lead scientists who want to standardize settings across their team - save a profile in the standalone pipeline, and it will be available for selection within the workflow wizard as well.
Note that saving the entire workflow configuration as a single profile is not currently supported. Profiles are applied per step.
For more information on saving and managing profiles, see Saving your analysis settings as profiles.
Viewing your results
This workflow will produce a Biologics Annotation Result document, which is the same document as running the Antibody Annotator standalone pipeline. The result is saved in the same folder as your input files, or in the folder specified in the Output step.
Like any other Biologics Annotator Result document, you can also:
- Filter your Sequences
- View the Graphs for Quality Assurance and Graphs to interpret Clusters and Clonotypes
- Perform Sequence Alignments
- View the "Clusters" in your dataset
- Add new Clusters to your Results
- Subset your sequences and re-calculate clusters
- Add Assay Data to your Analysis Results
- Compare Results across Multiple Experiments to monitor clonal expansion or to identify sequences present across multiple datasets.
- Edit your Sequences
- Repair low-quality sequences after Annotation